Vegetable Song for Kids

I came across a fun little vegetable song that my kids enjoy singing now, and wanted to share it with you.

The song is super easy to learn because you sing it to the tune of Twinkle Twinkle Little Star. If you have children who don’t seem thrilled to eat their veggies, give this song a try!

Here it is:  Vegetable Song for Kids

If you really want to have fun with it, sing it while plugging your nose.

Another great way to get your kids thinking about veggies is to ask them questions, like “What is your favorite vegetable to eat?” or “Which vegetables should we plant in our garden next year?”

And don’t give up! Just because they might not try a certain vegetable today doesn’t mean they won’t try it tomorrow.


Lemon Strawberry Cake

This Lemon Strawberry Cake smells good even before it goes in the oven! And if you really do fresh squeeze the lemons, your hands will also smell amazing.

lemon strawberry loaf cake


lemon strawberry cake recipe

Lemon Strawberry Cake Recipe

Ingredients (makes 2 – 9×5 inch loaves):

  • 1 C. butter (2 sticks), unsalted and at room temperature
  • 2 C. granulated sugar
  • 4 eggs
  • 2 tsp. vanilla extract
  • 2/3 C. milk
  • 1 C. fresh squeezed lemon juice (about 4-5 good lemons)
  • 3 C. plus 1/4 C. all-purpose flour, divided
  • 1 tsp. baking powder
  • 1 tsp. baking soda
  • 1 tsp. salt
  • 2 C. fresh strawberries, diced

Ingredients for Glaze:

  • about 1 1/4 C. powdered sugar
  • about 3 Tbsp. lemon juice

Instructions:

  1. Preheat oven to 350 degrees F. and grease and flour two loaf pans.
  2. In a large mixing bowl, cream together butter and sugar. Add in eggs and vanilla. Mix well.
  3. Get out another bowl and stir together milk and lemon juice. Let sit about 5 minutes (and yes, it’ll curdle a little bit). Pour into large mixing bowl with the batter and mix well.
  4. In a small mixing bowl, combine 3 C. all-purpose flour, the baking powder, baking soda, and salt. Mix and add to the batter in the large bowl.
  5. In the small bowl, mix together diced strawberries with the remaining 1/4 C. all-purpose flour, until strawberries are coated with the flour. Fold strawberries into the batter in the large bowl.
  6. Spoon batter evenly into the loaf pans. Bake in preheated oven for 45 minutes, or until toothpick comes out clean. Let cool 20 minutes in the pans.
  7. For the glaze, stir together powdered sugar and lemon juice You may need to add a little more of either, just until you find a consistency you like. Drizzle how ever much of the glaze you want over the loaf cakes.

glaze lemon strawberry cake with glaze dense lemon strawberry cake with glaze lemon strawberry cake recipe 1 lemon strawberry loaf cake recipe

*Inspired by THIS recipe.

Egg in a Basket Breakfast

I learned about this recipe in the Coursera cooking class I took online by Maya Adams. It is such a good breakfast dish! Seriously, it is filling enough so that I’m not snacking all morning until lunch time. Pair it up with orange juice, grapes, or any other fruit or maybe a green smoothie.

Egg in a Basket Recipe

Ingredients (1 serving):

  • about 1-2 tsp. butter
  • 1 slice of bread (hearty whole grain breads work great!)
  • 1 egg
  • salt and pepper or cheese to taste

Instructions:

  1. Heat a pan to medium heat. Melt the butter in the pan and gently swirl it around to cover the bottom of the pan.
  2. Use a cookie cutter or a cup to cut out a hole in the center of the bread. Place the bread in the pan and crack the egg into the whole. Some of the egg will spill out on top and on the edges of the bread, and that’s okay!
  3. Sprinkle lightly with salt and pepper. Wait about a minute or two and then flip over to cook the other side. Wait another minute or two before removing from heat. The yolk is sometimes still runny, so if you want your yolk cooked solid, then poke with a fork to test if it’s done. If it’s not done, the liquid will come out and will cook faster for you. But honestly, the partially runny yolk helps make it so it’s not so dry. It’s pretty good. 🙂

Serve immediately so it doesn’t get cold!

egg in a basket breakfast recipe

egg in a basket breakfast idea

Fruit Rainbow

We had a lot of fun making this fruit rainbow today! You can easily make adjustments, depending on what you have on hand, what your preferences are, and what’s on a good deal at the market (or what you have growing in your garden).

Our kids are still pretty young so we didn’t have to be picky about all the specific rainbow colors… like indigo…

Making a fruit rainbow with your kids is a great opportunity to teach them about rainbows. My husband told us the story about Noah’s Ark and we sang a song about rainbows (you know, we wanted to prolong this cool activity as much as we possibly could). 🙂 We also took some pictures of our little creation before indulging in the clouds and colors.

Fruit Rainbow

Ingredient Options:

  • Red: strawberries, cherries, red apples, raspberries
  • Orange: oranges, tangerines, cantaloupe, mango
  • Yellow: pineapple, bananas, mango
  • Green: green grapes, honeydew melon, green apples, green pear
  • Blue/Indigo/Violet: blueberries, blackberries, purple grapes
  • White Clouds: vanilla yogurt, whipped cream, or marshmallows (we did a combination of mini marshmallows topped with whipped cream)

Instructions:

  1. Find a flat surface to make your rainbow (like a plate or cookie sheet).
  2. Arrange the fruit/berries to look like a rainbow (your kids would probably love helping with this part, and now is a great time to talk about rainbows if you want to).
  3. Add yogurt/marshmallows/whipped cream at the two ends of the rainbow to look like fluffy clouds.

Enjoy the beautiful fruit rainbow!

fruit rainbow

Easy Raisin Scones

This was my first time making scones and we ended up really liking them. They are like a light, flaky biscuit with raisins. Although the raisins were great, I’m excited to try this recipe out replacing them with blueberries or pecans. Or cranberries. Yum!

A lot of times you see scones in a triangular shape. This recipe is for drop scones. You just drop blobs of the dough onto the cookie sheet and stick them in the oven. Very easy.

easy raisin scones

Easy Raisin Scones Recipe

Ingredients (makes about 30 medium scones):

  • 4 C. all-purpose flour
  • 1/2 C. granulated sugar
  • 3 tsp. cream of tartar
  • 1 1/2 tsp. baking soda
  • 1/2 tsp. salt
  • 2 tsp. lemon zest (from about 1 large or medium lemon)
  • 1 C. (2 sticks) unsalted butter, room temperature
  • 1 C. buttermilk (or SIMPLE BUTTERMILK SUBSTITUTE)
  • 1 C. raisins

Instructions:

  1. Preheat oven to 425 degrees F.
  2. In a mixing bowl, mix together the flour, sugar, cream of tartar, baking soda, salt and lemon zest.
  3. Cut in the butter with two knives or a pastry cutter until the mixture resembles course crumbs.
  4. Gently stir in the buttermilk or buttermilk substitute just enough so that the dough leaves the sides of the bowl and forms a ball (or one big clump).
  5. Gently fold in the raisins.
  6. Lightly shape dough into golf ball sized clumps. You can shape into a round ball, but do not pat the dough down firmly (if you work with it too much, the scones may turn out more tough).
  7. Bake about 9-10 minutes in the preheated oven (until the tops are beginning to turn a golden brown color).
  8. Immediately place cooked scones on a cooling rack to cool.

raisin scones recipe

These scones taste great once cooled down a bit and are still delicious the next day. You could probably even freeze and thaw them later and I think they’d still taste great!

Fettuccine Alfredo with Vegetables

Enjoy this Fettuccine Alfredo with homemade Alfredo sauce. Once you make it yourself, you won’t want to ever go back to the jarred Alfredo sauce!

Fettuccine Alfredo with Vegetables Recipe

Ingredients:

  • 16 oz. Fettuccine noodles, dry
  • 1 crown broccoli, washed and chopped
  • 1 zucchini, washed and chopped
  • 1 Tbsp. olive oil
  • 6 Tbsp. salted butter
  • 4 cloves garlic, minced
  • 1/2-1 Tbsp. corn starch
  • 2 C. whole milk
  • 1 1/2 C. (6 oz) grated Parmesan cheese
  • 1/2 C. chopped Italian parsley
  • salt and pepper to taste

Instructions:

  1. Cook the fettuccine noodles as directed on the package, adding the chopped broccoli and zucchini for the last 2-3 minutes or so of boiling. Drain, return pasta to pot and stir in the olive oil so the noodles don’t stick together. 
  2. While the noodles are cooking, melt butter in a saucepan on medium-low heat. Saute garlic in the butter for about 1 minute and then whisk in the corn starch.
  3. Add milk and bring to a simmer and let simmer for about 5 minutes, whisking very frequently so it doesn’t burn or get clumpy on the bottom of the saucepan.
  4. When it starts to thicken, whisk in the cheese for about another 4-5 minutes and then stir inn the parsley.
  5. Pour the sauce over the fettuccine and vegetables and mix together. Serve immediately.

This Fettuccine Alfredo goes great with sliced bell peppers or a fresh salad!

*Inspired by THIS recipe.

Pulled Pork Crescent Rolls

pulled pork crescent rolls pulled pork crescent rolls 1 pulled pork crescent rolls recipe

Wondering what to make with leftover pulled pork? These sweet Pulled Pork Crescent Rolls are super easy to make and they taste amazing.

Pulled Pork Crescent Rolls

Ingredients (makes 8 crescent rolls):

  • 1 (8 oz) package refrigerated crescent rolls
  • 1 Tbsp. salted butter
  • 2 cloves garlic, minced
  • 1 jalapeno pepper (remove seeds and flesh), diced
  • 1/2 large red bell pepper, diced
  • about 1 C. leftover sweet pulled pork (try not to have too much sauce… we don’t want the rolls to get soggy)
  • a handful of spinach (I used frozen spinach)
  • optional: Ranch Dressing for dipping (adds the perfect touch!)

Instructions:

  1. Heat a pan to medium-high heat. Melt the butter in the pan and swirl it around to cover the bottom of the pan.
  2. Add the bell peppers, jalapeno, and garlic. Saute for about 4 minutes.
  3. Add the (thawed) pulled pork and spinach. Mix together and cook for a few more minutes until the pork is warm.
  4. Preheat oven to 350 degrees F.
  5. Lay the crescent roll triangles on a baking sheet. Spread about 1-2 Tbsp. of the pork mixture onto each triangle. Roll them up lightly, starting from the base of the triangle and ending at the tip.
  6. Bake in preheated oven for 12-14 minutes.
  7. Let cool for a few minutes before eating.

Enjoy these Pulled Pork Crescent Rolls with a simple green salad.

Quinoa Patties

These Quinoa Patties are SO yummy! And not to mention, they are easy to make, smell great, have a crispy outside, and are healthy. Quinoa is high in fiber, iron, and protein.

We ate these Quinoa Patties with carrot sticks, but they’d be great with full-on salad too!

Quinoa Patties Recipe

Ingredients (10-12 patties):

  • 2 C. cooked Quinoa (see instruction #1 on how to cook Quinoa)
  • 3/4 C. shredded cheddar cheese (I used Open Nature Medium Cheddar)
  • 1/2 C. cottage cheese (I used 4 % milkfat and large curd)
  • 1 C. packed finely chopped kale (or zucchini squeezed dry, or grated carrot)
  • about 1/4 C. chopped green onions (including the white part)
  • 3 eggs
  • 4 Tbsp. all-purpose flour
  • 1/2 tsp. sugar
  • 1/4 tsp. cumin
  • 1/4 tsp. black pepper
  • 1/8 tsp. salt
  • 1/8 tsp. garlic powder
  • olive oil for frying

Instructions:

  1. To cook the Quinoa, bring 2 C. water and 1/2 tsp. salt to a boil. Stir in 1 C. uncooked Quinoa and reduce heat to low. Cover, and simmer for 18-20 minutes, or until water is absorbed. This will make just over 2 C. of cooked Quinoa.
  2. While the Quinoa is cooking, get out a large mixing bowl. Combine cheddar cheese, cottage cheese, kale or zucchini or carrot, green onions, eggs, flour, sugar, cumin, black pepper, salt, and garlic powder.
  3. When the Quinoa is done cooking, add 2 cups of it to the mixture in the bowl. Mix together well with a spoon.
  4. Heat a pan to medium-low heat. Add about 1 Tbsp. olive oil and carefully swirl around to coat the bottom of the pan.
  5. Add 1/4 C. of the mixture for each patty (I cooked them in batches of three). Flatten to about 1/2 inch thick with a spatula. Cook for 4-6 minutes on each side. Add a little olive oil before cooking the next batch if the pan is looks dry.

healthy quinoa kale patties

quinoa patties recipe

*Inspired by THIS recipe.

Moist Chicken Breast Tenderloins

Over here, we make chicken more than I post on this blog, but chicken breast usually turns out a little dry for us and that’s why I don’t want to post those recipes. Thankfully, though, we recently found a recipe that makes truly moist chicken breast. And, to our pleasant surprise, these tenderloins tasted like they were coated in a delicious gravy!

Moist Chicken Breast Tenderloins Recipe

Ingredients:

Instructions:

  1. Lightly salt and pepper the chicken tenderloins.
  2. In a shallow/wide bowl, combine flour with salt and pepper.
  3. Salt and pepper the chicken tenderloins, then dip each side of each tenderloin in the flour mixture so it is lightly dusted with flour.
  4. Heat a pan to medium-high heat. Add butter and olive oil and spread so that the bottom of the pan is coated.
  5. Turn heat to medium and add the chicken breast tenderloins in a single layer in the pan. Cook for about 1 minute on each side to help them get a golden color on each side.
  6. Turn heat to low and cover with lid. Cook for 10 minutes without lifting the lid.
  7. After 10 minutes, lift the lid and flip the chicken tenderloins to the other side. Put the lid back on and cook for another 10 minutes without lifting the lid.
  8. The tenderloins should be thoroughly cooked now, but check them just to be safe. You can use a meat thermometer or slice a few of them in the middle and make sure it’s cooked thoroughly.

These chicken breast tenderloins go great with mashed potatoes and a salad! You can also use them to top salads or pastas.

*Inspired by THIS recipe.

Peanut Butter Cookies (no eggs)

Why have I let us go on several days without any eggs in our refrigerator?

Maybe because I don’t want any more eggs splattered on the couch (see this no-egg pumpkin pancake recipe).

Or perhaps I’m taking my precious time until we absolutely have to go grocery shopping (because grocery shopping is no easy task with two toddlers). But I refuse to try out the convenient online grocery shopping option unless I’m ever bed-ridden because I want my kids to learn how to shop. And it gives us a good reason to get out of the house. 🙂

So I must be having way too much fun trying recipes without eggs!

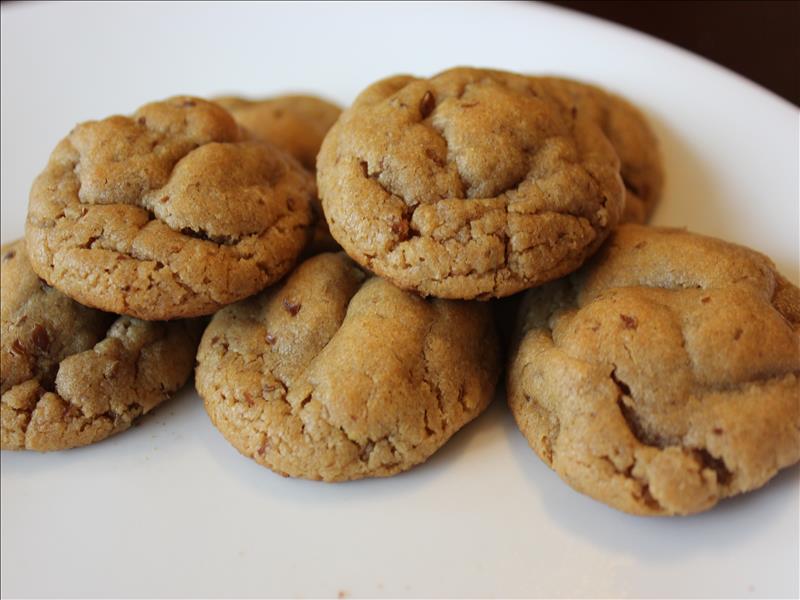
Mmmm, like these vegan peanut butter cookies. The are slightly crispy on the outside, but it’s like you’re biting into a peanut butter cloud on the inside.

Peanut Butter Cookies (no eggs) Recipe

Ingredients:

  • 3 Tbsp. all-purpose flour
  • 3/4 tsp. baking soda
  • 1 Tbsp. flaxseed meal
  • 1/4 C. granulated sugar
  • 2 Tbsp. brown sugar
  • 1/2 C. peanut butter
  • 2 Tbsp. applesauce
  • 1/2 Tsp. vanilla extract
  • optional: tiny pinch of salt (taste the dough first to see if you want it any saltier)

Instructions:

  1. Combine dry ingredients (flour, baking soda, flaxseed meal, and sugars) together. Mix well with a fork and get any brown sugar lumps out.
  2. Add peanut butter, applesauce, and vanilla extract. Mix well. Taste the dough and you can add a tiny sprinkle or pinch of salt if you want them a little saltier.
  3. Refrigerate for at least an hour if you want to make them chewy.
  4. Preheat oven to 350 degrees F. Roll dough into balls ( about 16 of them each about 1/2 Tbsp. round) and bake on cookie sheet in preheated oven for about 7 minutes.
  5. Remove from oven and let the cookies sit on the cookie sheet for about 5 minutes more to finish cooking.

Enjoy the peanut butter goodness!

vegan peanut butter cookies

*Inspired by THIS recipe.